

How to Create a Calendar in Excel: Templates, Formulas, and Copilot
There are three ways to make a calendar in Excel, and the right one depends on what you actually need. If you want something printable in five minutes, a template is the fastest path. If you want a calendar that updates itself every time you change the month or year, you build one with a few formulas. And if you have Copilot in Excel, you can hand off some of the setup to it. This guide covers all three, plus how to turn a plain calendar into a real tracker with events, categories, color, and checkboxes.
One thing to get straight up front. Excel is not trying to replace Outlook. If you need meeting invites, reminders, availability, or recurring appointments, Outlook is the better tool and it is not close. Excel earns its place when the calendar is also a tracker, a printable monthly planner, a project deadline sheet, a PTO planner, a content calendar, or a shared schedule you want to filter and report on. That is the job Excel does well, so that is what this article focuses on.
When To Use an Excel Calendar
Reach for Excel when your calendar needs structure, filtering, or math behind it. It is a good fit for project calendars, editorial and content calendars, staff schedules, PTO trackers, school-year calendars, event planning, maintenance schedules, deadline trackers, and monthly task lists. Anything where you want to sort, categorize, or run a quick report on the entries belongs in a spreadsheet.
Skip Excel when you need the things a real scheduling app does. Meeting invites, automatic reminders, live personal scheduling, room booking, availability lookups, and two-way syncing with Outlook are all outside what a spreadsheet handles well. The honest way to think about it is that Excel is best when the calendar is part of a larger tracker, and Outlook is best when the calendar needs reminders, invites, availability, or recurring meetings. The two are not really competing. They solve different problems.
What Changed Recently in Excel and Microsoft 365
A few updates are worth knowing before you start, because they affect how you build and where the buttons are:
- Copilot in Excel is more capable than it used to be, but what you get depends on your license and tenant settings, not just having Microsoft 365.
- Microsoft is rolling out a floating Copilot button in Excel, Word, and PowerPoint, so the way you open Copilot may look different than it did.
- Editing with Copilot can now make direct changes in supported workbooks instead of only suggesting them.
- Excel Agents in the Microsoft 365 Copilot app can create a spreadsheet from a prompt.
- In-cell checkboxes are now a simple way to add TRUE and FALSE task tracking, which is handy for calendars that double as checklists.
- The COPILOT function exists, but it is the wrong tool for calendar date math, and it is still limited by license and rollout.
If a Copilot feature in this article is missing for you, it may not have reached your account yet. Whether you see new features early often comes down to whether your organization uses Targeted Release.
Option 1: Use a Built-In Excel Calendar Template
This is what most people actually want, especially if the goal is a clean monthly calendar you can print. Microsoft keeps a solid set of calendar templates, and starting from one saves you all the formatting work.
On Excel for Windows
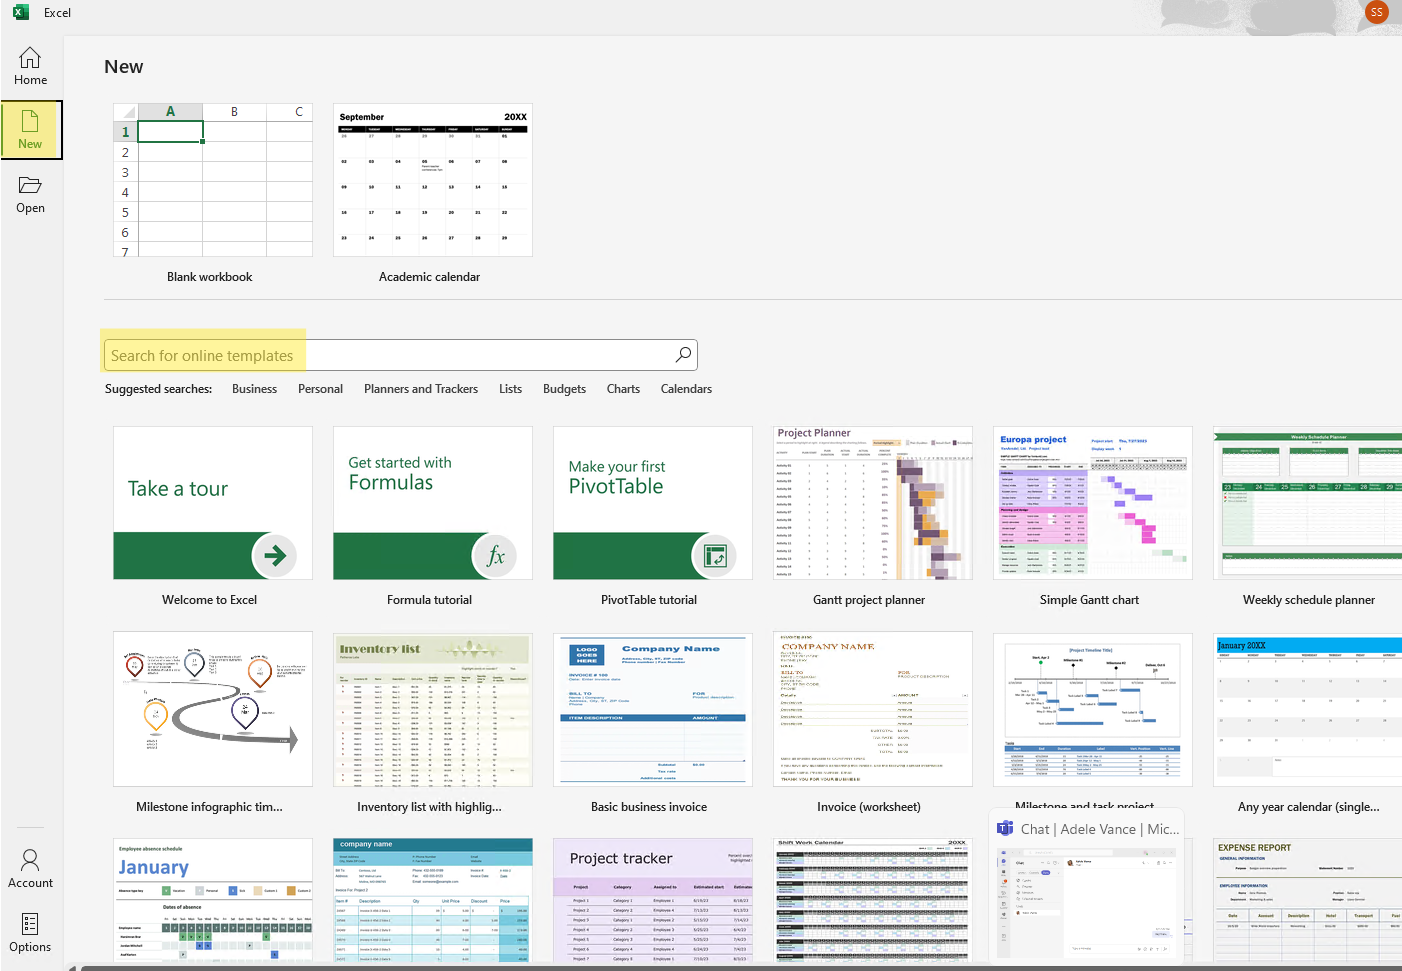
- Open Excel.
- Select New.
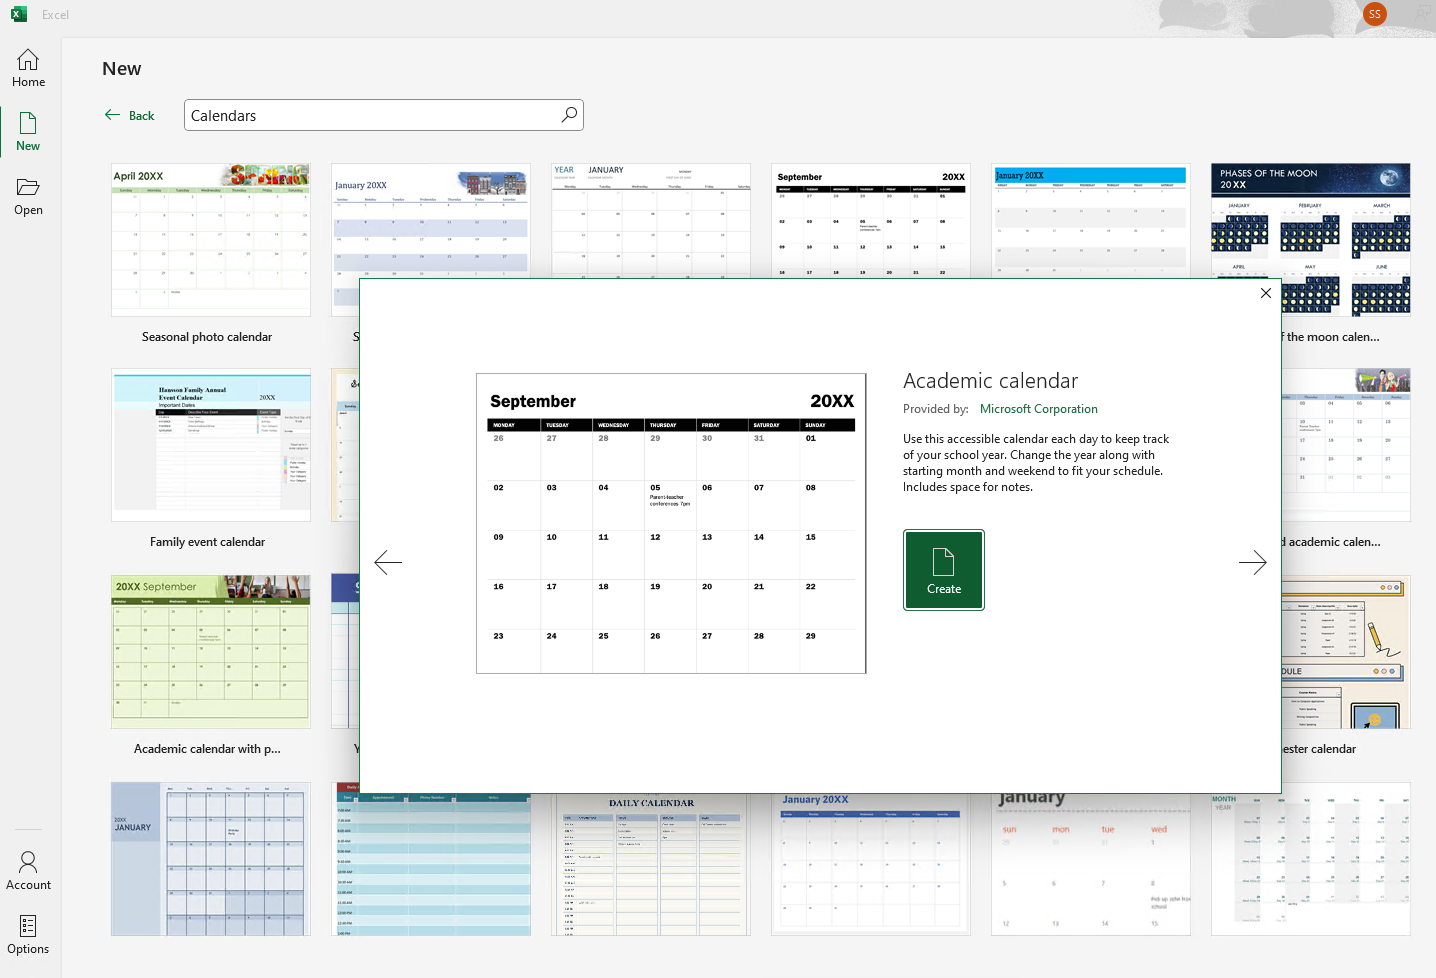
- Type Calendar into the search box.
- Browse the available templates.
- Pick the monthly, yearly, academic, or planner-style calendar you want.
- Select Create.
- Save the file with a clear name so you can find it later.
On Excel for the web
- Go to Excel for the web.
- Select File.
- Select New.
- Choose Browse templates.
- Search for Calendar.
- Open the template you want and save it to OneDrive.
What to look for in a template
Calendar templates are not all built the same way, so it pays to glance at the structure before you commit. Some put all twelve months in one workbook, others use one month per worksheet. You will also find academic year calendars, versions with a notes area, ones with a built-in task list, vacation planners, daily schedule trackers, and layouts designed to print cleanly. Pick based on how you plan to use it, not just how it looks in the preview.
Customizing a template without breaking it
Once a template is open, a few edits make it yours. Change the year or month field if the template has one, rename the worksheet tabs, add a notes column, and adjust the theme colors. You can add categories like Work, Personal, Deadline, Travel, PTO, or Holiday, and a small legend so the colors mean something to anyone who opens the file.
Here is the part people miss. Many templates use formulas behind the date cells, which is what makes the dates update when you change the month or year. If you type directly over those cells, you break the automatic updates and the calendar stops recalculating. Before you do heavy customizing, make a copy of the file, and avoid typing over any cell that contains a date formula. If a template has protected cells, that protection is usually there to stop you from doing exactly that.
Option 2: Build a Dynamic Monthly Calendar From Scratch
Building your own takes a little longer, but you end up with a calendar where you type a year and a month into two cells and the whole grid updates on its own. It also teaches you formulas you will reuse in plenty of other spreadsheets. This is the most useful part of the article if you want something reusable.
Set up the inputs
Keep the layout simple. Put your two inputs near the top:
- Cell B1: the year, for example 2026
- Cell B2: the month number, for example 6 for June
In row 4, type your day headers across seven columns, A4 through G4: Sun, Mon, Tue, Wed, Thu, Fri, Sat. The date grid will fill rows 5 through 10.
Generate the dates with one formula
For a calendar that starts on Sunday, click into cell A5 and enter this:
=LET(first,DATE($B$1,$B$2,1),start,first-WEEKDAY(first,1)+1,SEQUENCE(6,7,start,1))That one formula fills the entire grid. Here is what each piece is doing. DATE builds the first day of the month you chose. WEEKDAY figures out which day of the week that first day lands on. The formula then backs up to the Sunday that begins the calendar view, so the grid lines up under the right headers. SEQUENCE fills a 6-row by 7-column block of dates starting from that Sunday. Six rows covers every month, including the ones that spill across six weeks.
If you prefer Monday as the first day of the week, which is common outside the U.S., change your headers to Mon through Sun and use this version instead:
=LET(first,DATE($B$1,$B$2,1),start,first-WEEKDAY(first,2)+1,SEQUENCE(6,7,start,1))The only difference is the 2 inside WEEKDAY, which tells Excel to treat Monday as the start of the week.
Show only the day number
Once the formula spills the dates into the grid, the cells hold full dates, which is not what you want to see on a calendar. Fix the display without changing the underlying value:
- Select the calendar grid.
- Press Ctrl + 1 to open Format Cells.
- Choose Custom.
- Enter
das the format code.
Now each cell shows just the day number, but it still contains the real date underneath, which matters for the formatting rules below.
Add a month title
Above the grid, drop in a title that updates with your inputs:
=TEXT(DATE(B1,B2,1),"mmmm yyyy")Change B1 or B2 and the title changes with it, reading something like June 2026.
Gray out dates from other months
A six-week grid always shows a few days from the previous and next month at the edges. Graying those out makes the current month stand out. Select the date grid, open Conditional Formatting, and add a new rule that uses a formula:
=MONTH(A5)<>$B$2Set the format to a light gray font or fill. Make sure the cell reference in the rule, A5 here, matches the top-left cell of your grid, or the rule will line up against the wrong cells.
Highlight today
Add a second conditional formatting rule so the current date is easy to spot:
=A5=TODAY()Give it a border or a fill color. This one updates on its own every day.
Highlight weekends
For a Monday-start calendar, weekends fall in the last two columns, and this rule catches them:
=WEEKDAY(A5,2)>5For a Sunday-start calendar, the weekends are the first and last columns, so you can apply a fill straight to the Sunday and Saturday columns, or use the same WEEKDAY approach if you prefer a formula.
Add an Events Sheet So the Calendar Becomes Useful
A calendar gets a lot more useful when events live in a proper table instead of being typed straight into date cells. A table is easier to filter, sort, and report on, and it lets you reuse the same calendar grid month after month without retyping anything.
Create a separate worksheet named Events with these columns:
- Date
- Event
- Category
- Owner
- Status
- Notes
Select that range and convert it into an Excel table, then name the table Events. Keeping events in a structured table is cleaner than scattering them across calendar cells, and it makes everything later, like color coding and reporting, far simpler.
Pull events into the calendar grid
If you want events to appear inside the calendar, the cleanest approach is to keep the real date grid separate and use a second display grid for the visible calendar. The hidden date grid can hold the actual dates, while the visible grid combines the day number with any matching events from the Events table.
For example, if the real date is in A5, a display cell can use:
=TEXT(A5,"d")&IFERROR(CHAR(10)&TEXTJOIN(CHAR(10),TRUE,FILTER(Events[Event],Events[Date]=A5)),"")Turn on Wrap Text so multiple events stack neatly inside the cell. This keeps the real date available for formulas while still showing the event names on the calendar. If that feels like more than you need, skip it and just type events directly into the date cells. This formula relies on dynamic array functions, so it works best on Microsoft 365 and newer versions of Excel. On older versions, a template or manual entry is the easier route.
Add Dropdowns and Categories
Dropdowns keep your data clean. Without them, you end up with PTO, Vacation, Time Off, and Out of Office all floating around meaning the same thing, which wrecks any filtering or reporting you try to do later.
Set up a short list to choose from. A practical set of categories is Meeting, Deadline, PTO, Holiday, Project, Personal, Travel, and Content. Then:
- Create a small table named Categories and put the category names in one column.
- Select the Category column in your Events table.
- Go to Data.
- Select Data Validation.
- Choose List.
- Point the source at your category list.
Now every category gets picked from the same list, and your reports stay consistent.
Add Color Coding
Color makes a calendar easier to scan at a glance, as long as you keep it under control. A small, consistent palette works far better than a rainbow. A reasonable scheme is deadlines in red, PTO in green, meetings in blue, holidays in gray, and personal items in purple.
For a simple calendar, color the cells by hand. For a structured one, apply the color to the Events table by category using conditional formatting, then use that table for filtering and reporting. The goal is for someone to glance at the sheet and immediately understand what kind of day each one is, so resist the urge to color everything.
Add Checkboxes for Task-Style Calendars
If your calendar is also a checklist, checkboxes are a clean way to track progress. They fit content trackers, habit trackers, cleaning schedules, maintenance calendars, and any recurring task list. Common uses are columns like Published, Completed, Approved, Paid, Scheduled, or Followed up.
To add them:
- Select the cells where you want checkboxes.
- Go to Insert.
- Select Checkbox.
A checked box stores TRUE and an unchecked one stores FALSE, so you can drive formulas off them. For example:
=IF([@Done],"Complete","Open")Checkboxes work best inside the Events table rather than in the monthly grid, where a single cell often has to hold a date and an event name already.
Option 3: Use Copilot to Help Create a Calendar
If your account has Copilot in Excel, it can speed up the building process. It can rough out the workbook structure, write formulas, explain formulas you do not understand, clean up event data, and suggest formatting. Treat this as optional. Everything above works without Copilot, and the templates and formulas are doing the real work either way.
One thing to be clear about is licensing, because it trips people up. Not every Microsoft 365 user has the same Copilot. Copilot Chat, the full Microsoft 365 Copilot, and the in-app Excel features all vary by subscription, work or school account, tenant settings, region, and rollout status. For the fuller commercial in-app experience, you generally need the Microsoft 365 Copilot add-on license. Some Copilot Chat experiences show up without the add-on, but they are not the same as the full work-grounded version. I get into the details of this in what Copilot can do in Excel.
The way you open Copilot is also changing. Microsoft is rolling out a floating Copilot button in Word, Excel, and PowerPoint. In Excel it sits in the workbook and opens Copilot in the right-side chat pane. If you do not see the old ribbon button, look for the floating one instead.
Prompts that work well
If you want Copilot to do the heavy lifting, specific prompts get better results:
- Create a monthly calendar for June 2026 with a Sunday to Saturday layout. Include space for events and notes.
- Build a dynamic Excel calendar where I can change the year and month in two cells and have the calendar update automatically.
- Add an Events table with columns for Date, Event, Category, Owner, Status, and Notes.
- Create dropdown categories for Meeting, Deadline, PTO, Holiday, Project, Personal, Travel, and Content.
- Add conditional formatting so dates outside the selected month are gray and today's date is highlighted.
- Explain the formula used to generate the calendar dates.
Editing with Copilot and the Excel Agent
Newer Copilot experiences can make changes directly in a workbook rather than only handing you formulas to paste. On supported accounts, Editing with Copilot in Excel can build a calendar layout, add formulas, create tables, and format the file from a plain-language prompt. Review its work before you rely on it, especially for a calendar other people will use.
There is also the Excel Agent in the Microsoft 365 Copilot app, which is a different thing from using Copilot inside an open workbook. With the agent, you describe the spreadsheet you want and Copilot creates a new one. That can be a fast starting point for a calendar, but check the formulas, dates, and formatting before sharing it.
What Not to Use Copilot For
Copilot is good for structure and speed, but it should not be the final word on dates that have to be exact. Do not lean on AI-generated values for payroll schedules, legal deadlines, compliance calendars, medical schedules, or financial close calendars without checking them.
The rule that keeps you safe is simple. Let Copilot help build the structure, but let Excel formulas drive the actual dates. Deterministic date formulas recalculate the same way every time, which is exactly what you want from a calendar. AI-generated text does not carry that guarantee, so it does not belong in the cells that have to be right.
Print the Calendar Cleanly
Plenty of people build a calendar just to print it, and a custom grid does not always print neatly without a little setup:
- Select the calendar range.
- Go to Page Layout.
- Set Orientation to Landscape.
- Set the Print Area to your selection.
- Use Fit Sheet on One Page so it does not split across sheets.
- Adjust the margins if anything is tight.
- Check Print Preview before you print.
Templates usually handle print layout better than a calendar you built yourself, so if printing is the whole point, starting from a template is often the faster way to get a clean page.
Share the Calendar With Others
Sharing a calendar file is not the same as sharing an Outlook calendar, and treating it like one leads to a mess of emailed copies. The clean approach is to keep one file that everyone works from:
- Save the workbook to OneDrive or SharePoint.
- Use the Share button rather than emailing the file around.
- Decide whether people can edit or only view.
- Keep it in a modern .xlsx format.
If several people need to update the calendar, OneDrive or SharePoint lets them co-author the same file instead of trading versions. For a team-owned calendar, SharePoint is usually the better home because ownership lives with the site or team rather than one person's OneDrive, so the calendar does not disappear when someone leaves. If your team already builds processes in SharePoint, a shared calendar fits right alongside something like a SharePoint approval workflow.
Excel Calendar vs Outlook Calendar
It helps to see the split side by side, because the two tools really are built for different jobs.
| Excel is better for | Outlook is better for |
|---|---|
| Project schedules | Meeting invites |
| Printable planning | Reminders |
| Tracking tasks | Recurring meetings |
| Categorizing events | Availability |
| Filtering and sorting | Room booking |
| Reporting | Personal daily scheduling |
| PTO planning | Mobile notifications |
| Content calendars | Sharing with external people |
One important limitation to know. Excel does not give you native two-way live sync with Outlook calendars. You can export or import calendar data in some situations, but an imported calendar file is usually a snapshot. If the original changes later, your imported copy will not update on its own. If live scheduling matters, that work belongs in Outlook, and if you are getting more out of Outlook in general, its rules feature is worth a look.
Troubleshooting
My dates show up as serial numbers
Excel is showing the underlying date value instead of a formatted date. Format the cells as dates, or use the custom d format to show just the day number.
My calendar starts on the wrong day
Check which WEEKDAY logic your formula uses. The number 1 inside WEEKDAY gives a Sunday start, and 2 gives a Monday start. Match that to your day headers.
The formula spilled into the wrong cells
Dynamic array formulas need empty space to spill into. Clear out any cells in the area where the grid needs to expand, and the spill will correct itself.
Dates from the previous or next month are showing
That is normal for a full six-week grid. Use the conditional formatting rule above to gray those days out so the current month stands out.
My template stopped updating
You most likely typed over a formula cell. Download a fresh copy of the template or restore an earlier version of the file, then avoid editing the date cells directly.
Data validation is grayed out
The sheet may be protected, or it may be shared in a way that blocks validation changes. Unprotect the sheet or adjust the sharing settings before editing the validation rules.
Copilot does not show up
This usually comes down to license, account type, update channel, privacy settings, admin settings, region, or rollout timing. Any one of those can be the reason the feature is missing.
The floating Copilot button is missing
The floating button only appears for accounts that have access to Copilot. If your account does not have access, you will not see it.
Frequently Asked Questions
What is the fastest way to create a calendar in Excel?
Use a built-in template. Search for Calendar from the New screen, pick a template, and customize it. You get a formatted, print-ready calendar in minutes without writing a single formula.
Can I create a calendar in Excel without a template?
Yes. Use DATE, WEEKDAY, and SEQUENCE to build a dynamic grid that updates whenever you change the month or year. It takes a bit longer to set up but gives you full control.
Can I make the calendar update automatically each month?
Yes. Store the year and month in two input cells, then base the calendar grid and title on those cells. Change the inputs and everything recalculates.
Can I add events to an Excel calendar?
Yes, and the cleanest way is a separate Events table with columns for Date, Event, Category, Owner, Status, and Notes. From there you can filter, sort, and report on events instead of digging through calendar cells.
Can I link an Excel calendar to Outlook?
Not as a native two-way sync. Outlook is the right tool for live scheduling, reminders, and invites. Excel is better for planning, tracking, reporting, and printing. You can move data between them in some cases, but an import is a snapshot, not a live link.
Can Copilot create a calendar in Excel?
Yes, if your account has the right Copilot experience. Copilot can build the layout, write formulas, add formatting, and explain how the calendar works. What you can do depends on your license, account type, tenant settings, app version, and rollout status.
Do I need Microsoft 365 Copilot to make a calendar in Excel?
No. Templates and formulas work fine without Copilot. Copilot is optional and mostly speeds up setup or editing.
Can I use the COPILOT function to create a calendar?
The COPILOT function is not the right tool for the date math. Use normal Excel date formulas for the calendar grid, since they recalculate predictably. The COPILOT function is meant for semantic tasks like summarizing, classifying, tagging, or generating sample text, and it is still limited by availability and licensing.
Can multiple people edit the calendar at the same time?
Yes, as long as the workbook is saved in OneDrive or SharePoint, shared with edit permissions, and stored in a modern .xlsx format. That is what enables real-time co-authoring.
Can I print an Excel calendar?
Yes. Set the print area, switch to landscape orientation, and scale the sheet to fit on one page. Use Print Preview first so you do not waste paper on a layout that splits.
Final Thoughts
The right method comes down to what you need. If you just want a printable calendar, start with a template. If you want a reusable calendar that updates every month, build it with DATE, WEEKDAY, and SEQUENCE. If you have Copilot, use it to speed up the setup, but let Excel formulas handle the actual dates. That combination gives you the best balance of speed, accuracy, and flexibility, and it leaves you with a calendar that keeps working long after you build it.