

How to Create a SharePoint Approval Workflow in Microsoft 365
SharePoint approval workflows are one of those topics where the answer to "how do I set one up?" is almost always "it depends." Not because the tools are complicated, but because "approval workflow" means different things depending on what you actually need to happen after someone clicks Approve.
Do you just need a notification that someone signed off? Do you need the item to disappear from view until it is approved? Do you need the file to become read-only so no one can change it afterward? Or are you dealing with something regulated where the approved document needs to be locked as an official record? The answer to those questions determines which method you should use, and they are not all the same thing.
This article walks through every major option available in Microsoft 365 as of 2026, explains what each one actually does, and helps you pick the right approach for your situation. Note that classic SharePoint Designer workflows are not covered here. Microsoft retired SharePoint 2013 workflow for new tenants in April 2024 and removed it from existing tenants in April 2026. If you are still running those, Power Automate is now the supported replacement.
The Three Decisions You Need to Make First
Before you build anything, you need to answer three questions, because they drive everything else.
Who needs to approve? A single person? The first person to respond? Everyone on a list? Multiple people in sequence? Some workflows route to different approvers based on metadata, like a department or dollar amount.
What does "approved" mean for visibility? Some teams want the item hidden from regular users until it is approved. Others just want a status column updated. Others want an email or Teams card.
What happens to the item after approval? This is the one most people do not think about upfront. If the answer is "nothing, it can still be edited," your workflow is much simpler. If the answer is "it should become read-only," or "it needs to be retained as an official record," you are looking at a different set of tools.
Option 1: Modern Approvals Built Into SharePoint Lists and Libraries
This is the simplest starting point. SharePoint lists and document libraries have a built-in approvals feature that lets users request approval for a specific item or file without leaving SharePoint. The approval request shows up in the Teams Approvals app and in Outlook, and approvers can respond from either place.
In the current SharePoint experience, approval settings may appear under ... > Integrate > Approvals. In some tenants, Microsoft still shows the older path as Automate > Configure Approvals. Both paths lead to the same Modern Approvals configuration experience, depending on which SharePoint command bar version your tenant is running.
How to enable Modern Approvals in the new SharePoint UX
- Open the SharePoint list or document library.
- In the command bar, select the ellipsis (...) menu.
- Select Integrate.
- Select Approvals.
- Choose the option to enable or configure approvals.
Once approvals are enabled, select a file or list item and choose Request approval. Add one or more approvers, choose whether any approver can approve or all must respond, add any relevant details, and send the request. The approval status changes to Requested once the request is created.
If your tenant still shows the older command bar, the path is Automate > Configure Approvals instead. The result is the same either way.
There are a few things worth knowing about how this works before you enable it. First, the approval request does not automatically grant the approver access to the underlying item. If the approver does not already have permission to view the list or library, they cannot see what they are being asked to approve. You need to handle that separately through SharePoint permissions.
Second, if the file is edited while an approval is in progress, the approval gets canceled. Office web apps (Word, Excel, and PowerPoint for the web) will open the file in view-only mode during an active approval, and Windows desktop apps show the document as "Marked as final" to discourage changes. But the file is not locked. Someone with edit permissions can still overwrite it and the approval will be voided.
What this option does not do: it does not make the item read-only after approval. Once the approval is complete, the item stays fully editable. If that is a requirement, you need one of the methods further down this article.
One more thing worth being clear about: Modern Approvals are not the same as classic SharePoint content approval. Microsoft states that content approval and request sign-off are not integrated with Modern Approvals. They are separate features that serve different purposes, which the next section explains.
Best for: simple business approvals, travel requests, lightweight content sign-off, Teams-integrated approval tracking. Not ideal for compliance-sensitive documents or anything that needs to be locked after approval.
Option 2: SharePoint Content Approval
SharePoint content approval is a list/library setting, not a workflow. The concept is simple: submitted items stay in "Pending" status and are only visible to the submitter and users with approval permission. Once an approver approves the item, it becomes visible to everyone with read access. Rejected items go back to the submitter. To configure it:
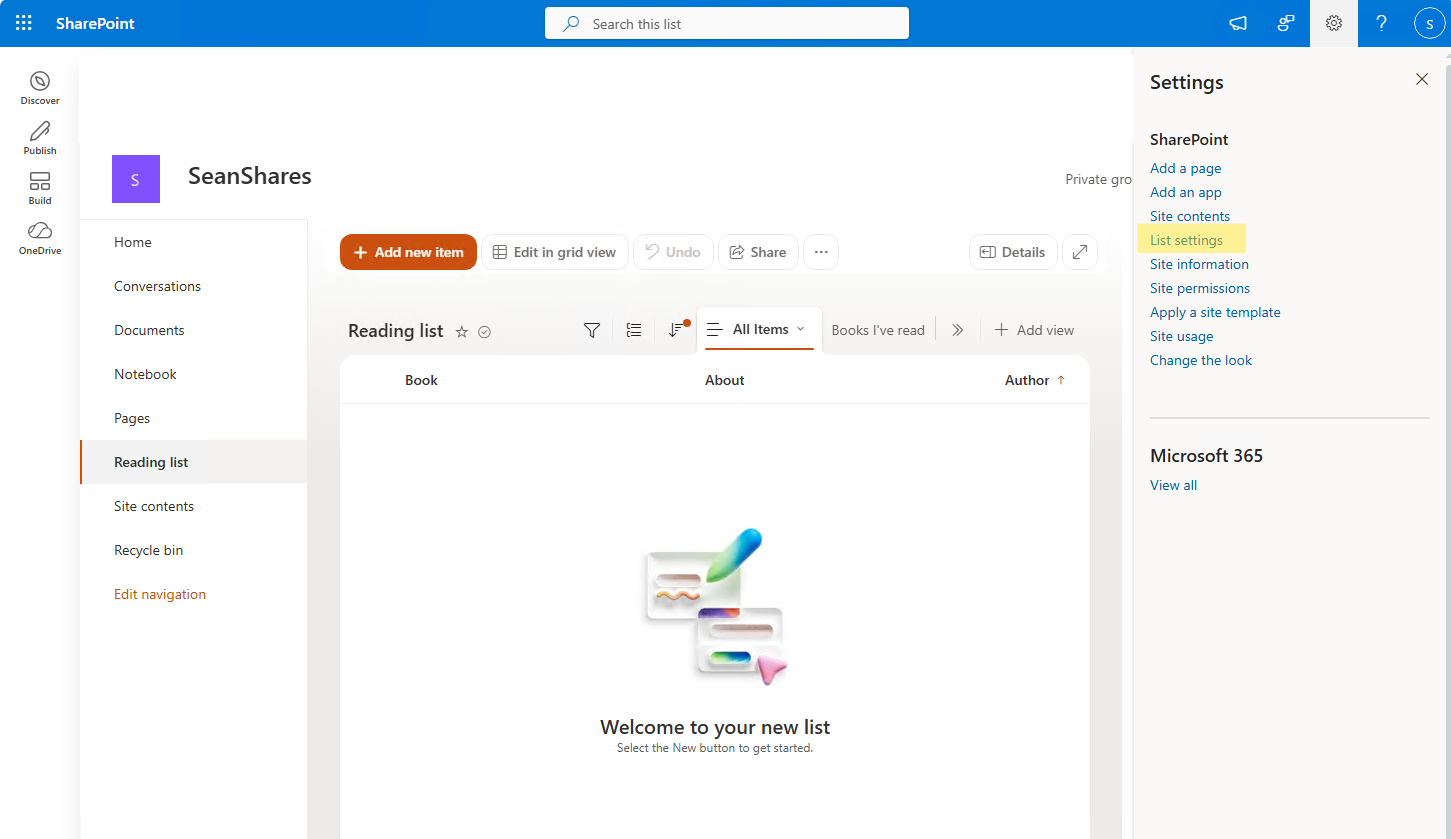
- From your list click on the List settings gear icon.
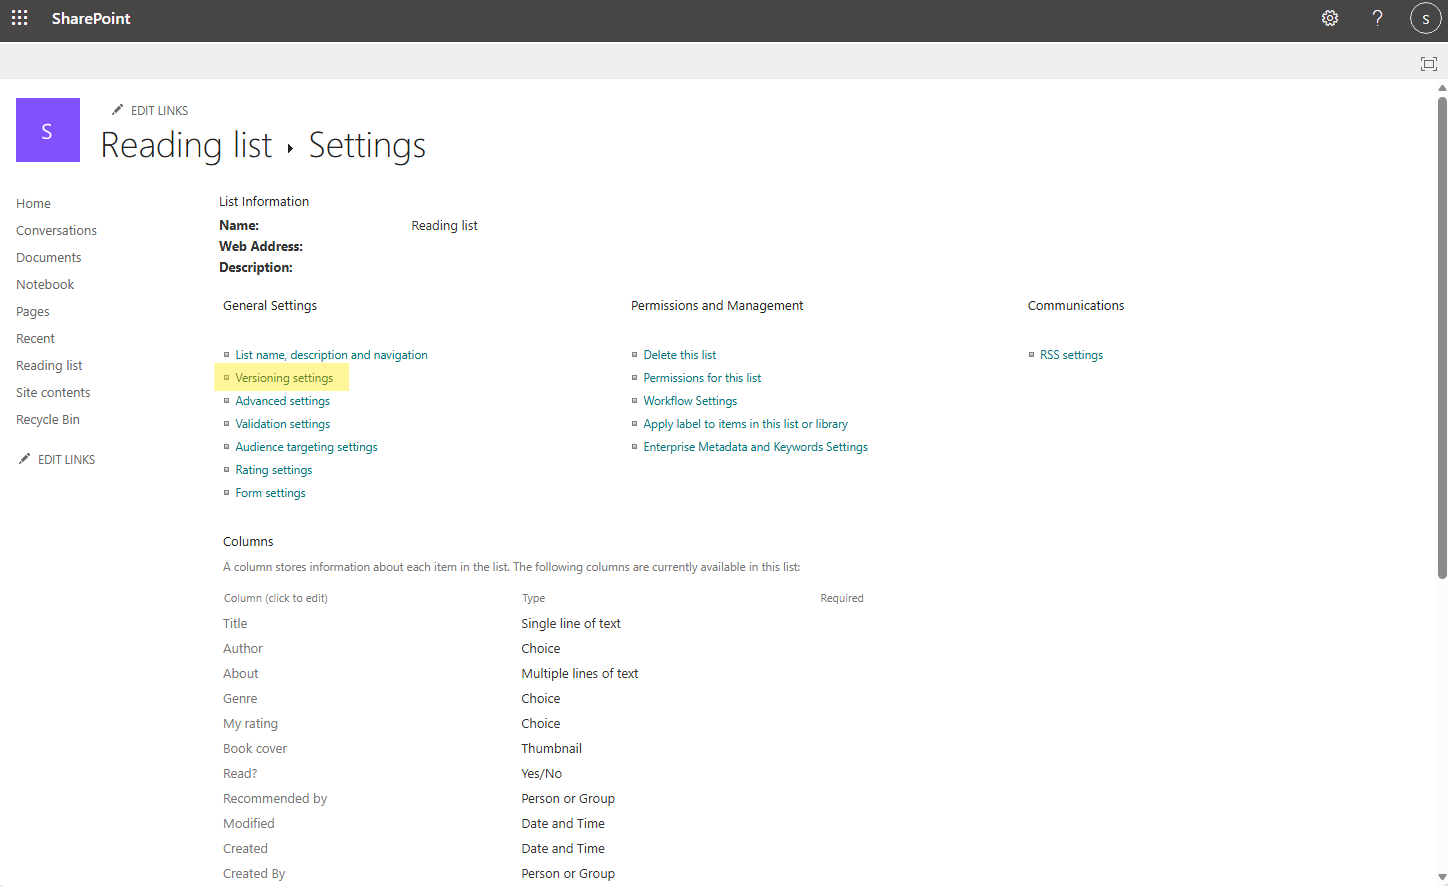
- Open Versioning settings.
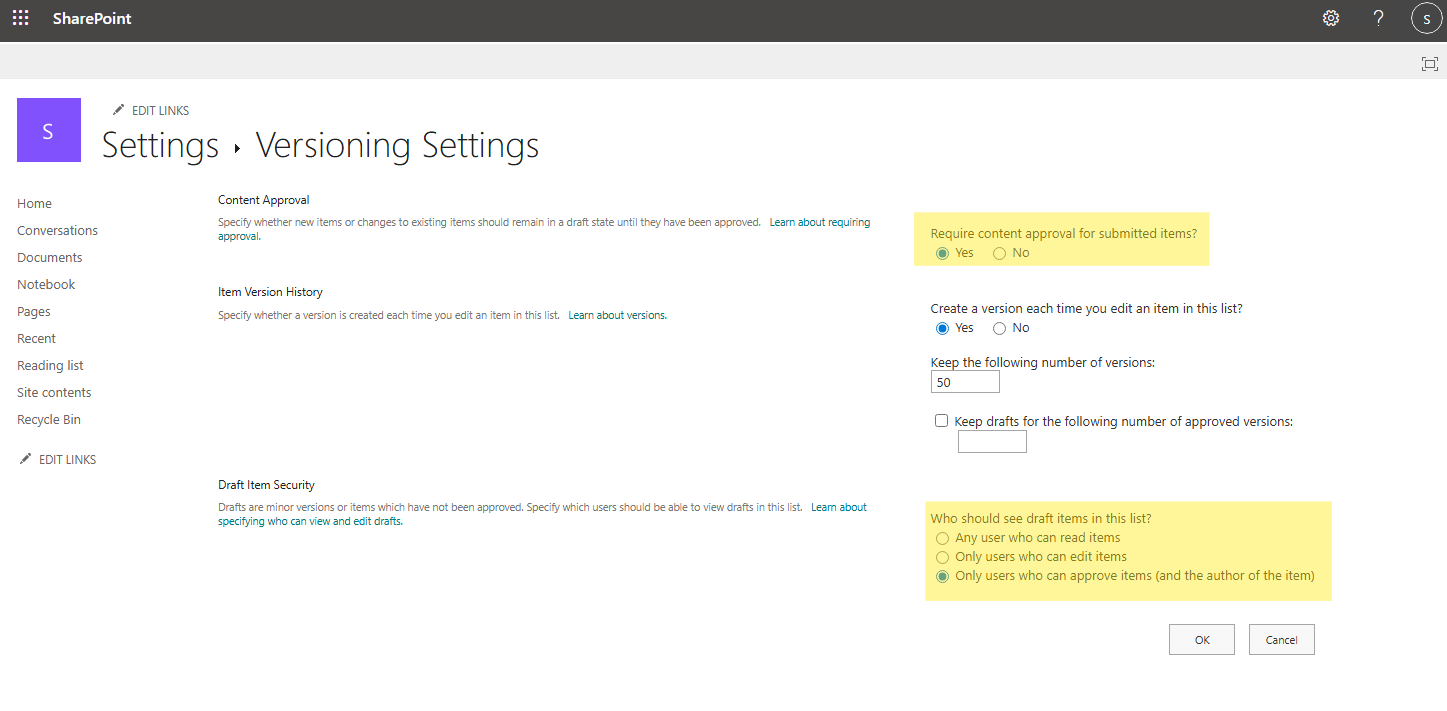
- Set Require content approval for submitted items? to Yes. While you are there, you can also set Draft Item Security, which controls who can see items in pending or draft status. Your options are: anyone with read access, only users with edit permission, or only approvers and the item's author.
One thing to know about versioning: if you enable major and minor versions in a document library along with content approval, uploaded documents will start as Draft rather than Pending. They only become Pending when promoted to a major version. If you only enable major versioning, they go straight to Pending on upload. This trips people up when they first set it up.
Content approval is good for intranet pages, HR policy drafts, marketing materials, and knowledge base articles where the goal is "do not publish until reviewed." It is not an edit lock. Once an item is approved, users with edit permissions can still modify it, and the next version may go back into pending depending on your versioning setup.
You can also combine content approval with a Power Automate flow so the approval request is automated rather than manual. The SharePoint connector has a Set content approval status action that works well for this. For files and pages, this action requires an ETag value, which you pull from the file metadata step earlier in the flow.
Option 3: Power Automate Approval Flow
Power Automate is the right tool when you need routing logic, dynamic approvers, multi-stage approvals, integration with other systems, or a detailed approval history. The core action is called Start and wait for an approval. The flow pauses at that step until all required approvers respond, then continues based on the outcome.
- In the newer SharePoint interface, open the list or document library and select Workflows from the command bar.
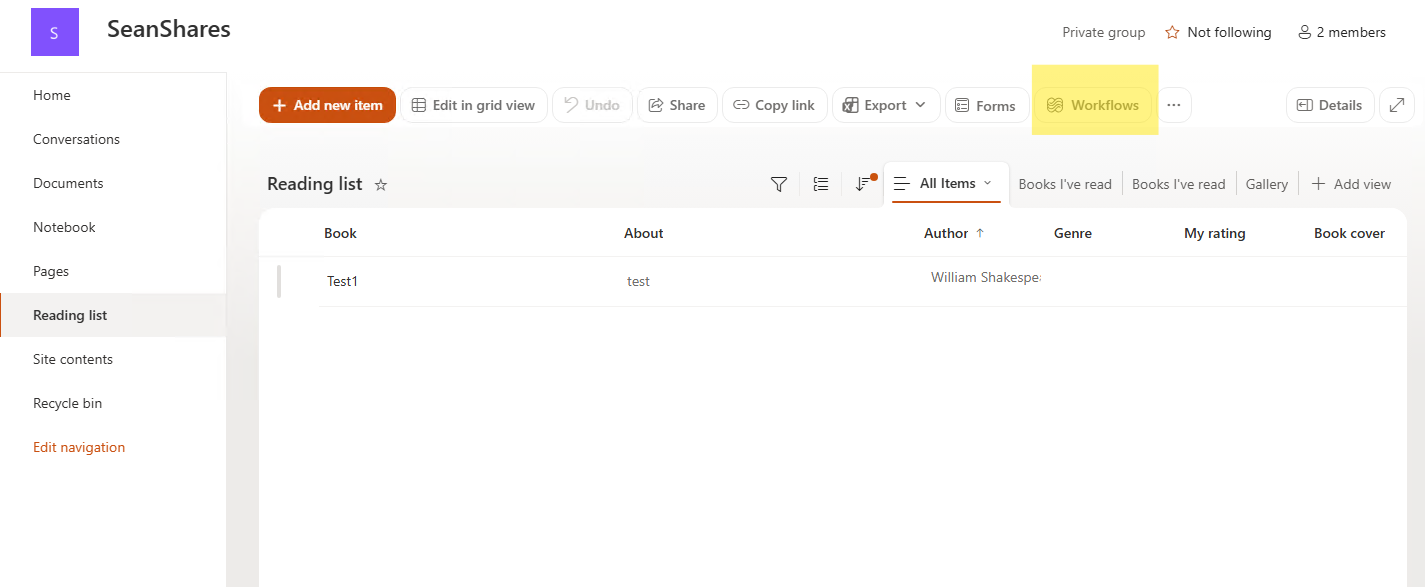
- From there, you can create or manage workflows connected to that list or library.
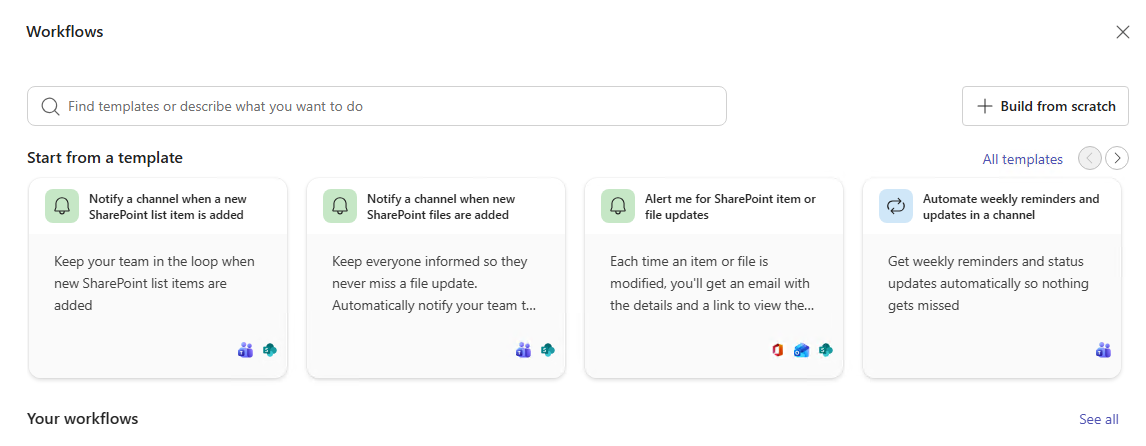
From the workflow experience, you can choose a pre-built template or open Power Automate to build a custom approval flow. A common structure looks like this: a trigger fires when an item is created or modified, the flow gets the item metadata, starts the approval with one or more approvers, then branches based on whether the item was approved or rejected.
On approval, the flow can update a status column, optionally set the SharePoint content approval status, and send a notification. On rejection, it can update the status to Rejected and notify the submitter with any comments the approver left.
Power Automate supports several approval types. "First to respond" is useful when any approver can approve. "Everyone must approve" is for sequential or consensus-based processes. Custom response options let you add more than two outcomes if the business process requires it.
One limitation people run into: the Set content approval status action works on lists, but for files and SharePoint pages it requires you to pass the file's ETag in the flow. You get this from a Get file properties or Get item step before the approval runs.
A basic Power Automate approval flow does not lock the item after approval. It updates metadata and sends notifications. If you need locking, you need to add additional steps, which the next two sections cover.
If you are managing Copilot's place in your Microsoft 365 environment, the article on Copilot admin settings to review for governance is worth reading alongside this one.
Option 4: Using Copilot to Build the Flow Faster
Copilot in Power Automate lets you describe what you want in plain language and it generates a starting flow for you. For approval workflows, this can save a lot of time on the initial build. You describe the trigger, the approval routing, what happens on approval and rejection, and Copilot creates the flow structure with the appropriate connectors and actions.
An example prompt for a basic approval: "Create a cloud flow for a SharePoint document library. When a file is created in the Policies library, start an approval assigned to the user in the Policy Owner column. Include a link to the file. If approved, set the Approval Status column to Approved and send the requester an email. If rejected, set the Approval Status column to Rejected and include the approver comments."
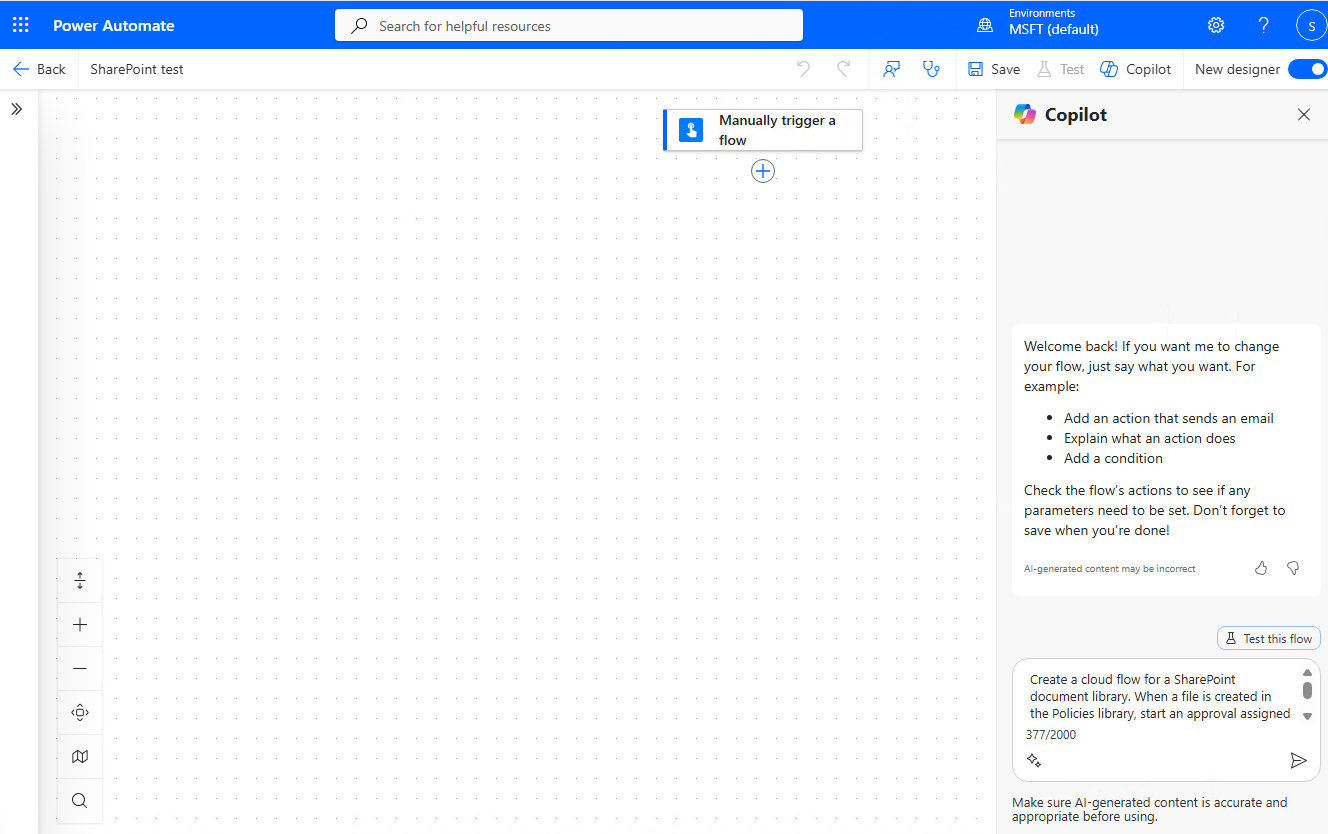
For a flow that locks the item using permissions after approval, you might prompt: "Create a Power Automate flow for a SharePoint list. When an item is submitted for approval, start and wait for an approval. If approved, update the Status column to Approved, stop sharing the item, grant read access to the submitter and department visitors group, and keep owners with full control."
There are real limitations to keep in mind. Copilot does not support all connectors and is optimized for English. More importantly, whatever it generates still needs review. Copilot can scaffold a flow quickly, but it does not know your permission groups, your SharePoint site structure, your error handling requirements, or your governance rules. Treat it as a starting point, not a finished product.
Option 5: Locking the Item After Approval Using Permissions
If your requirement is "once approved, regular users cannot edit this item," you do it by changing permissions on the item after approval. Power Automate has SharePoint connector actions that make this possible without writing REST code.
The most straightforward approach uses two actions after the approval completes: Stop sharing an item or a file (which removes all permissions on the item except site owners), followed by Grant access to an item or a folder to give specific users or groups read-only access. The item's owner group retains full control. Everyone else who had edit access through inherited permissions is locked out at the item level.
For more granular control, like removing specific groups while keeping others, you can use SharePoint REST API calls in a flow to break permission inheritance and apply new role assignments. This gives you precise control but is more complex to set up and test.
Before you go down this path, consider scale. Microsoft's supported limit for unique permissions on items in a list or library is 50,000, but the practical recommendation is to stay well under 5,000. If you have a library where hundreds or thousands of items will go through this process, you will hit problems. Design the process so that uniquely permissioned items stay in a dedicated library separate from high-volume storage. The SharePoint permissions overview on this site covers how permissions inheritance works and is useful background reading before building this.
This approach is a business lock, not a compliance lock. Site owners and admins can still modify permissions or edit the item. If you need a lock that even admins cannot override without a records management workflow, you need the next option.
Option 6: Compliance Lock with Microsoft Purview Retention Labels
For documents that need to become official records after approval, such as contracts, board-approved policies, audit evidence, or regulated content, the right tool is a Microsoft Purview retention label that marks the document as a record.
This option usually requires involvement from a Microsoft 365 admin, compliance admin, or records management owner. Retention labels are created and published from the Microsoft Purview compliance portal, not directly from a normal SharePoint library setting. Before this can be used in an approval workflow, someone with the right admin permissions needs to configure the retention label, decide where it should be available, and publish it to the appropriate SharePoint sites or libraries.
When a retention label marks a document as a locked record, editing and deletion are prevented. A regulatory record is even stricter: it cannot be edited or deleted regardless of user permissions. Users with Microsoft Purview Records Management access can unlock a record to make corrections, but the action is logged and controlled.
There are three ways to apply a retention label after an approval workflow completes.
- The simplest is manual: the approver or records manager applies the label from the document's properties after approving.
- The second option uses Power Automate with the Microsoft Graph API to apply the label programmatically using the
driveItem: setRetentionLabelendpoint. - The third is a Purview auto-apply policy that labels documents automatically based on keywords, sensitive information types, or trainable classifiers.
For most organizations, the manual or Power Automate approach makes more sense for approval-triggered labeling. Auto-apply is better for broad content classification policies that run across the entire tenant.
Keep in mind that using Purview for records management requires planning beyond just the workflow. Your Microsoft 365 admin or compliance team should help define the retention schedule, confirm licensing, publish the label to the right locations, and align with legal or records management stakeholders on what qualifies as a record and how long it must be retained.
What About Checkout?
Requiring checkout on a library is frequently mentioned alongside approval workflows, but it serves a different purpose. Checkout prevents two people from editing the same file at the same time. It is useful during the drafting phase of a controlled document process, but it is not a post-approval lock.
Once a checked-out file is checked in, anyone with edit permissions can check it out again. There is no connection between checkout status and approval status. Also worth noting: requiring checkout breaks co-authoring, because co-authoring depends on files being open without a checkout in place. If your team collaborates in real time on documents, enabling required checkout will create friction.
Use checkout when you have a library where only one person should edit a document at a time and co-authoring is not needed. Do not use it as a substitute for post-approval locking.
SharePoint Page Approvals
Modern SharePoint pages have their own page approval feature. When enabled, authors submit a page for approval before it is published to the site. The page shows as "Pending approval" until a reviewer approves or rejects it. Approved pages are published and become visible. Rejected pages go back to the author as drafts.
This works well for intranet news, department landing pages, policy pages, and executive communications where you want editorial control before publishing. It does not lock the page from future edits after approval. If a page is later edited, the new version goes back into pending for review.
Microsoft Teams Approvals
The Teams Approvals app lets users create and manage approval requests without building a Power Automate flow. Approvers can review and respond from within Teams. For ad hoc approvals, purchasing sign-offs, or quick request tracking, this is often enough.
The relationship to SharePoint is important to understand. Teams Approvals is the interface for making and responding to requests. If the item being approved lives in SharePoint, Teams Approvals does not automatically update that list item or document. You either use Modern Approvals (which integrates SharePoint and Teams Approvals together) or a Power Automate flow that both sends a Teams approval card and updates the SharePoint item based on the response.
Picking the Right Approach
Here are some ways to think through it:
- If you need a quick, self-contained approval tied to a specific file or list item without building a flow, start with Modern Approvals in the list or library.
- If the goal is controlling visibility (keeping items hidden until reviewed), use SharePoint content approval, optionally paired with a Power Automate flow for routing.
- If you need routing logic, dynamic approvers, multi-stage sign-off, or integration with other systems, build a Power Automate flow. Use Copilot to speed up the initial build if available.
- If approved items need to become read-only for business governance reasons, add permission-breaking steps to your Power Automate flow after approval. Watch the scale limits.
- If approved items need to become immutable records for compliance, apply a Purview retention label after approval, either manually or through the Microsoft Graph API.
For most organizations, the right answer is a combination: Power Automate for routing and notifications, SharePoint content approval or a status column for tracking, and either permission-based or Purview-based locking depending on the compliance requirements of the content type.
Common Mistakes
A few things consistently trip people up when building SharePoint approval workflows.
- Assuming that "approved" means the item is read-only. Approval status by itself is just metadata. If you set a status column to "Approved" and send a notification, the item is still fully editable by anyone with edit permissions. You have to explicitly lock it if that is a requirement.
- Forgetting that Modern Approvals do not automatically share the item with approvers. If an approver does not have existing access to the library, they will receive the approval request but will not be able to see the underlying file. Grant them access first, or build a sharing step into the flow.
- Applying unique permissions to every item in a high-volume library. This can hit the recommended limit of 5,000 unique permissions faster than you expect, especially in a library with ongoing submissions. If you need per-item permission control at scale, move approved items to a separate archive library and manage permissions there.
- Using checkout as the post-approval lock. Checkout controls editing during drafting. It has nothing to do with finalization.
- Skipping testing on Copilot-generated flows. Copilot builds a working starting structure, but it does not know your specific environment. Triggers, connection references, column names, and error handling all need validation before you put a Copilot-generated flow into production.
Frequently Asked Questions
Can I require approval before a file appears in a SharePoint document library?
Yes. Enable content approval in the library's versioning settings and configure Draft Item Security so that pending items are only visible to users with approval permission. New uploads will sit in Pending status until an approver approves them.
Do I need Power Automate for SharePoint approval workflows?
Not for basic approvals. SharePoint has built-in Modern Approvals that work without a flow. Power Automate is needed when you want routing logic, dynamic approvers, multi-stage approval, integration with other systems, or post-approval locking behavior.
How do I make a SharePoint file read-only after it is approved?
You do this through permissions, not approval status. In a Power Automate flow, after the approval completes, use the Stop sharing an item action followed by Grant access to an item to give specific users or groups read-only access. Alternatively, apply a Microsoft Purview retention label that marks the item as a locked record, which prevents editing at the platform level.
Will editing a file cancel an in-progress SharePoint approval?
Yes. If a file is saved with changes while a Modern Approval is in progress, the approval is canceled. Office web apps open the file in view-only mode during an active approval to discourage this, but the file is not technically locked. Someone with edit permissions can still overwrite it.
Can I use Microsoft 365 Copilot to create an approval workflow?
Yes. Copilot in Power Automate lets you describe the workflow in plain language and generates the flow structure. It is useful for getting a starting point quickly. You still need to review and test what it generates, especially around connection references, permission logic, and error handling.
What is the difference between SharePoint content approval and a Power Automate approval?
SharePoint content approval is a library/list setting that controls visibility. Items stay hidden from regular users until an approver approves them. A Power Automate approval is a routing and notification mechanism. The two can be combined: Power Automate can trigger the approval request and then set the SharePoint content approval status based on the outcome.
How do I lock a SharePoint document as an official record after approval?
Apply a Microsoft Purview retention label that marks the document as a record. This can be done manually, through a Power Automate flow using the Microsoft Graph API, or through a Purview auto-apply policy. A locked record label prevents editing and deletion. A regulatory record label is even stricter and cannot be unlocked by non-records-management administrators.
What happened to SharePoint Designer approval workflows?
Microsoft retired SharePoint Designer 2013 workflows. They were turned off for new tenants in April 2024 and removed from existing tenants in April 2026. Power Automate is now the recommended replacement for any automation that previously ran through SharePoint Designer.